Monday, October 26, 2009

The Pleated Pillow

If you haven't seen this.. well... then here it is! This is the most awesome pillow ever! I've made several plain pillow covers, but haven't ever seen this pleated front before.. This has a pleated front, and is just an envelope back. Super Easy! But I never would've thought it up on my own.. I saw this post on Living with Lindsey, and just HAD to try it! I was really happy with how they turned out and they were very easy! You should try it!! Here are the ones that I made for my mom's B-Day.


Tuesday, October 20, 2009

Cold Saturday morning + Estate Sale = Very Happy Me!!

My mom and I braved the cold and went out yard sale-ing early Saturday morning. We found this estate sale, and I'm SO glad we went there first!
We found some AWESOME stuff! I was so excited! I've been looking to change the colors in my room, instead of burgundy (which it's been for 5 years) changing it to Aqua, Gray, White and Black. I found the most gorgeous blue jars/vases (?) for a buck each!


I also got some milk glass vases to put in my room as well, .50c each!


Some cute little pewter sugar and cream cups (they need a little bit of shining) but they were very cute for .50c each. Also that little blue glass vase was .50 to go in my mom's bathroom.


I thought at first this was like a door knocker thing, but my husband convinced me that it's like a hand-towel holder. I just thought it would make a cool thing to hang on my wall. I've since painted it black. Love it!


I also picked up this foot stool type thing for $2, which I've also painted black. I'm planning on putting a little cushion on it, so it doesn't look so outdated. But I think the black paint already has made a world of difference! It went from 70's looking.. to updated and modern, I love the circle design!


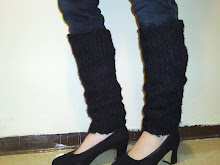
In this picture, you can also see a bag of wooden dowels, .50 and some socks that my mom had to buy for me cause she felt bad that I was in sandals and freezing cold.. ha ha What are moms for. Also, do you see that rediculously awesome frame around everything?? I got that at the next yard sale.. $4! I was going to just lean it against a wall by itself, but then I thought it would make an AWESOME faux headboard with some wood, batting and delicious fabric! Hopefully that project coming soon.

I just love how it's old and chipped looking, I don't want to change it at all, I don't think. Mmmm, isn't that pretty..


-Later, we did get some more awesome deals, I also got a great umbrella stroller with a canopy for $4

-My mom got a PERFECT condition changing table for $15! (for one of my sisters when they have kids) It's gorgeous!

-She also got a baby swing, a nice one with the mobile, lights, music, etc, for 5 BUCKS! Woo hoo!

-She also got new towels for one of her bathrooms for $3 new.

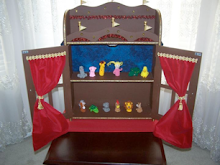
-She also got a very cool little cupboard with windows on it to make my daughter a finger puppet stage.. more on that to come!! $3!

-I also got a super awesome clock, it's so fabulous, I can't even describe it, but I don't have a picture of it and it's dark and late and cold and it's in my car, so I'll have to post it later, but it was only $2!!

I thought I'd just throw this cute little thing in here cause I love it, I just found it at the DI for .50c, it was white, and I spray painted it black.. now it's going on my wall too!


Yard sales are the best, I'm so sad the season's almost over!!

Monday, October 12, 2009

Frankenstein and Dracula! The Pillar People..

PBJ
(posts by Julie)


When we finished our house, I wanted to decorate for the holidays with something unique and fun, so I made these 'pillar people' for Halloween. I have put them up every October for 11 years, but they had become so faded that I didn't put them up last year, and boy did I hear about it
from the neighbor kids! So rather than start over, (I really don't have time right now to make new ones) I decided to do a quick touch up with some acrylic paint so I could hang them up one more time.


Before the touch-ups
(The cut out part on the frankenstein is where the gutter sits too close to the pillar, I couldn't slide it between them so I had to cut the fabric.)

I painted over the pant lines, (the faded pants just look grey as long as the lines are dark) the purple vest and coat, and the green face and hands. You can't tell from a distance, but the paint didn't cover the purple very well, it didn't spread well over the double-knit. Also, the green is a little brighter than I like, but oh well, it was quick. The frankenstein face and hands fabric is a rip-stop nylon and the paint went on smoothly there, maybe I'll fix the color when I take them down.

After the touch-ups

I also have 'tin soldiers' for Christmastime, and ideas for a set of people for Thanksgiving. We'll see if I find any time to put them together!

Aren't those awesome!!? (GREAT JOB MOM, I LOVE THOSE!!)

I'm participating in ASPTL DIY Day!


Saturday, October 10, 2009

Easy B-Day Present - $0

My daughter's little neighbor friend was having a birthday party this morning, but I didn't want to spend any money, so I just found some fabric I already had, and then put together a cute little pillow this morning. I wanted to make it have a little something special, so I got some alternating fabric to make a little letter "A" for her name on the front, and I also sewed an extra piece on the front like a little pocket.. It only took about a half hour including cutting, ironing and sewing. I already had the fabric, so it didn't cost me a dime!

I just ripped the fabric (love that! no cutting)
front piece, back piece, and a smaller piece for a pocket (same width, shorter height)

I just sewed the A onto the smaller pocket panel first and hemmed up the top edge of the pocket. I then sewed the pocket right onto the front panel.

Then I just sewed 3 sides and 3/4ths of the 4th side of the front panel to the back panel, and then flipped it right side out, filled it with poly fiberfil, and then sewed the small opening up.

Voila!

Cute easy gift. You could do so many different colors or styles, and adjust it for different ages, boys or girls. And the "free" part is what I like most!

Wednesday, October 7, 2009

Tray Re-do

I saw this tray made out of a cupboard door from the Crafty Nest, and I fell in LOVE! I'm talking serious drooling love. Isn't it gorgeous??

So, I've actually been looking for an old cupboard door every time I go to the thrift store, just so I could (try to) make something similar to this. I hadn't found one, but I did eventually find a tray that I really liked at the thrift store for just $3, and it was good sized and very sturdy, so I figured it would do the job.

My sister in law's birthday is coming up, so I thought I'd make it for her. Especially because I loved the black and white so much from the Crafty Nest's tray, and that is SO my SIL's style. I wanted to totally copy her design, like trace it from my computer screen!.. but I reasoned a little bit with myself, and thought I could just use some of her same elements, and do my own design.

Mine is not half as gorgeous as hers, but it turned out ok. I'm kinda sad that since mine wasn't out of a door, I couldn't add the awesome black handles to it. Oh well, some day.
Anyways, here's the before and after pics, enjoy!


I don't think my SIL reads this blog, but just in case.. Happy early Birthday, Jami!
If anyone wants to know, I just used white spray paint for the tray and then black acrylic craft paint, and a paint brush for the design!

To explain how I got my design on the tray:
I drew my design first on paper, and then I colored the back of the paper with chalk so that when I traced it over my tray, it would show my design in chalk on the tray.. but it also smudged blue chalk everywhere I didn't want chalk either! So I tried wiping it all off with a damp paper towel, but couldn't get it all off. It still prominently had made my design on the tray, along with lots of blue smudge.. so I traced the chalk design with a black sharpie. Then, I went at it again with my white spray paint to make sure I got all the light blue smudginess that was left, covered up. It covered up all the blue, leaving a faint gray line where I had used the black sharpie on my original design. Then, I just used my paint and brush over that line. That was way more steps than I was planning on, but it worked. Does anyone else have any good ways of transferring a sketch, if you don't have transfer paper?? I'd love your advice, thanks.

You may have to enlarge that pic to see my lines, but that's basically how it looked before I used my black paint to trace over the whitepaint-covered-sharpie-covered-chalk design.. whew.

Monday, October 5, 2009

Awesome Fabric Bookshelf

This post is linked to the DIY party @ Shanty2Chic, go check it out!Also linked up to Andy's Poppies at Play Creative Cats!

PBJ
Posts by Julie:


I saw a colorful fabric bookshelf at Big Lots that I thought would be great to have around for the grandkids, but for $30 it wasn't high on my priority list. I browsed at the DI a few times and eventually found a broken shoe rack (or maybe it was a vhs tape rack) but that gave me the dowels I needed for only $2.


I had a piece of particle board left from our kitchen sink that I cut for the sides of the shelf.


I drilled holes for the dowels, and also for two more dowels to help brace/support the lower edge of the shelf.


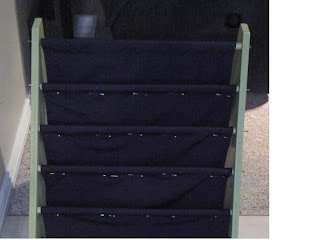
I painted the side pieces and dowels and then screwed in the lower dowels. (above)


I used a piece of heavy woven navy fabric I had, folded and sewed the long edges and made a casing to fit the lowest dowel. (I had lots of extra length, but later figured out how to use it ) I had to experiment draping it over each dowel to get the right length to hold the books how I wanted.


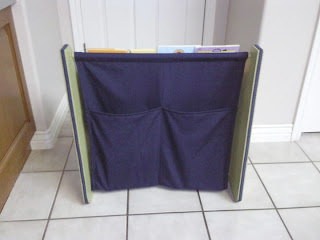
With the extra fabric hanging down the back of the shelf (after I sewed the last casing) I finished the short edge, folded it up and sewed 2 large pockets that I can store extra books in. That way I can rotate out books if I want but not have to store them elsewhere.


Next, I ran the dowels through the casings, screwed in the dowels, and painted over the screw heads.


Lastly, I hot glued some navy braid on the edges of the sides so it would look more finished, added the books, and I'm done!


I know my granddaughter will be excited to see her favorite books so easy to reach!


How cute! Way to be creative and save some money mom! My kids will love it ;) !!