Friday, August 28, 2009

Nightstand.. I LOVE IT!!

My mom gave me an old nightstand to fix up. It had a nice brown stain, but I wanted to use it in my daughters room, so I had other plans for it! I wanted to paint it white, to match her bed, but then I wanted to do something special with the top of it. My inspiration came from the quilt that I made for her when she was born. I wanted the top of the nightstand to be similar with different color blocks/squares.

After starting to sand it, this is what it looked like:


I then painted the whole thing white, and then I decided to paint the inside of the drawer burgundy to give a pop of color, that won't be showing all the time, as well as the drawer knob.


Next, I was ready to do the top. I found different scrapbook papers at the craft store on sale 5 for .95c so the paper was only $2 for all of it. I used ModPodge to glue the paper onto the table, and then to seal it on top of it.


I put a clear satin varnish coat over all of it, but it felt like it was missing something. I wanted something to match and balance out the red knob, so I took some fabric left over from my daughter's quilt, and modpodged it to the inside back of the shelf. I LOVE it!


Totally awesome jewelry holder!

I haven't always had a lot of jewelry, but for my birthday, I had some cash to use, so I went crazy at this one store where every piece was like $2! I got a bunch of stuff, but realized when I got it home, I had nowhere to put it.. there was no way it would fit in my small jewelry box.

I had seen someone turn an old door into a jewelry holder with hooks and rods to hold the different pieces, (I apologize, I don't know where I saw that site..) But that gave me the idea, so I was at the DI a few weeks ago and found this plain, tall wooden frame for a buck! I figured that would work. ( My before pics are on a different camera, so I'll post those when I find them.) First, I spray painted the frame black.

Once it was dry, I stapled a piece of plastic canvas to the back of the frame to hold my earrings.


I drilled holes in the frame, and used some hooks that already had the screws on them, so I could just screw them in. I put screws all over to hold all of my bracelets and necklaces.


I needed something to secure the bottom of the plastic, so I found a piece of wood in my mom's garage, and we cut it to the right size, and I painted it black. I screwed it in, and then stapled the bottom of the plastic canvas to it.


It turned out exactly how I planned, and looked even cuter once I got it hung and got my jewelry on it! Yay!!
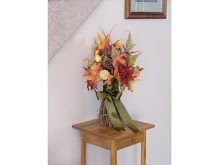


It's SO nice to have it all off the top of my dresser!! Woo hoo!
I'm in the process of making several more of these for the poppiesatplay craft market this September 26th. There will be TONS of homemade crafts and fun things to buy, so if you're free that day, come check it out!

Wednesday, August 26, 2009

I love changing pillows!

I have had the same pillow covers on my couch for quite a while, and I was ready for a change! A couple years ago, I found the easiest instructions on how to make a pillow sham, or if you don't like the ruffly edge, you can just do a pillow cover by eliminating the extra fabric on the ends. Since it was for my living room couch, I prefer not to have the ruffle. (I would probably leave it on if it was for a pillow sham on my bed or something) Before:


After:


I decided to go with 3 big pillows instead of the 2 big, 2 little, cause I was watching "Color Splash with David Bromstadt" and he said he always likes things in odd numbers, 3 or 5, etc. so I thought I'd try it, and I do like it a lot better. Yay, pretty new colors for my couch! Love it!! To try these pillow covers yourself, check out the easy online instructions HERE!

Monday, August 24, 2009

Clock - Dark to light

I am sick of everything on my entertainment center being dark, so I thought it would be a nice change to paint a dark brown clock I have, white.


I took off the hardware.. covered the insides with painters tape, and spray painted 3 coats of white paint on it.


Once it was dry, I realized I didn't have any sandpaper, but I did have some steel wool that I use for pot-scrubbing. I used that to distress the clock a little bit..


Hmm, once finished, I'm still not sure if I like it all that much. I'm not that into super-distressing stuff, but I think it needs more. Maybe I should get some sandpaper and go at it a little bit, or a lot a bit.. What do you think? It doesn't seem quite right yet...

Necklaces in a jar

I have been wanting to add or change some things on top of my entertainment center cause I have a lot of dark and black things, so I've been wanting to add some white things to brighten it up.

(sorry that clock already has painters tape on it cause I forgot to get a picture before I taped it) That project coming soon..

I first found this jar at the DI for a dollar! I loved the shape, so I had to have it.


Then I had remembered that about a year ago I had bought some necklaces at the DI for .25c each cause I thought I could use the beads for some other projects or to wear or give as a gift.


I decided to fill the jar with the necklaces and hide the chain best I could, I think it turned out pretty cute!


I'll update more pictures of my entertainment center as I get things fixed and added on..

Thursday, August 20, 2009

Why this blog?

I just thought I'd introduce myself and explain why I decided to create this blog. I've always had a desire to be creative and do things myself, and in the past I have done many craft projects, and looked up tutorials online of how to do things, or went to boutiques and said, "I could SO do that myself for way less money", but I was always too busy with work and other responsibilities that I didn't have time to do much with my desire. Now that my husband and I have two kids and enough financial aid through the University for his schooling, we're at a point where I can finally work one less job, and hopefully now have time to develop this burning interest of mine. Instead of doing one craft project every 3 or 4 months (yeah, I was WAY busy!) I hope to be doing things each week to make my home more beautiful, and to fulfill my desire to be creative and get a stronger sense of who I am and what I can create. The last few months I've been drooling over others crafty blogs, and learning things from their projects, but now is the time for me to go into action!! I'm so excited to start creating! My sister and mom have also caught the refinishing bug, and they've agreed to let me post some of their projects as well, in case I don't have time to get new projects on here as often as I'd like. Anyways, feel free to comment as often as you'd like, and let me know what you're working on too!

I just have to give a shout out to Andy Porter at
poppies@play, who is the author of the first "crafty/diy" blog that I started getting obsessed with! ;) She has so many cute ideas and information to help your own projects go smoother and easier. I've copied a lot of others project ideas because I've felt I didn't have the ideas in my own head (which is ok, and good practice, I think) but I love the quote on Andy's blog that says:
"Too many people believe that creativity is a talent with which some people are born and the rest of us can only envy. This is a negative attitude that is completely mistaken. Creativity is a skill that can be learned, developed and applied."~Edward de Bono
I believe that, and hopefully through "my creative attempts" I can develop that skill, and be able to learn and apply it in my projects! Happy Crafting!