Thursday, September 24, 2009

Delish Costa Vida/Cafe Rio Sweet Pork & Cilantro Lime Dressing!!

(That picture looks like the chicken salad, not the pork, but that's how the salad looks.. you get the idea!)

If anyone hasn't had Cafe Rio or Costa Vida sweet pork, you are missing out big time! Their pork salads or pork burritos are to die for! About a year ago, I found a recipe just like it, that is so easy, it's crazy! Some of you may have this recipe already, but if you don't, I'm telling you, TRY IT!! I also found a cilantro lime dressing that compliments it SO well, it's pretty close to the one at Costa Vida too. Anyways, I made it for dinner tonight, so I thought I'd share for those of you who haven't made it before.

Now the pork is just 3 ingredients. Yeah, you heard me!

1. Boneless Pork Roast (I use about a 2 or 3lb roast)
2. 1 and 1/2 Cups Brown Sugar
3. 2 cups salsa (mild, medium or hot, whatever you like, I use chunky cause that's what I usually have on hand)

(DON'T BE SKEPTICAL OF THE SALSA.. When I heard this recipe, I thought, "Costa Vida sweet pork does not taste like salsa at all, it's just sweet and juicy and tender and delicious, it can't be made of salsa.."
I'm telling you, the salsa combined with the brown sugar, mixed with the pork juices combine into something sweet and juicy and meaty, with a little kick, it's awesome!)

DIRECTIONS:
Just combine the brown sugar and salsa in a crock pot, and then add the pork roast, and spoon some of the sauce over the roast. Cook on low for 4-6 hours or until tender, (spooning the sauce over the roast several times) then take the roast out, shred it with two forks, and then put it back in the sauce to simmer at least another 1 hour or longer to really soak up the juices. Then you're done! If it seems like it's getting dry while it's simmering, add more salsa and brown sugar! It needs to be juicy!

At the restaurant, they do the pork salad as follows, which I always try to replicate, cause it's AWESOME!

1st- fried tortilla on the bottom
2nd- long grain rice (I've used vermicelli) and black beans
3rd- sweet pork
4th- lettuce
5th- pico de gallo
6th- guacamole
7th- crunchy tortilla strips
8th- grated parmesan cheese
9th- Cilantro Lime dressing (recipe below!)

(If you don't want to use all the ingredients, I would at least do the tortilla, pork, lettuce and the special dressing. Any other toppings are optional, but add a LOT of awesomeness! Especially when combined together!)

Cilantro Lime Dressing

*1 Buttermilk Ranch dressing packet
*1/2 c buttermilk (I never have buttermilk, so I always substitute one of these two alternatives:
a - Pour 1 TBSP Vinegar and the rest of the 1/2 cup with milk
or
b - 1/2 cup mayo or miracle whip
*1/2 c sour cream
*1 clove garlic (if I don't have real garlic, I've used garlic powder)
*juice of 1 lime (important)
*cilantro (very important!)
*Green salsa 1/2 cup (or a little more if you want a little more kick)

I just combine all the ingredients in my blender and pretty much puree it until it's a thick salad dressing consistency.


On top of the sweet pork, there's not a better combination! Seriously, it's worth it! I didn't have cilantro, so tonight I didn't make the dressing, and I just used ranch.. um, I won't do that again, it's just not the same! (my husband was kinda sad that I didn't do the dressing! whoops!)

Let me know if you try this and like it.. or don't like it (which I doubt =), but I'd love to hear if you try it!

Wednesday, September 23, 2009

Painting an antique look .. First try

So, Andy over at Poppies at Play always does awesome antiquing-looking-painting using gel stain, so I thought I'd better pick some up and try it. I had looked at Michaels a couple days earlier, and they didn't have any, but the next time I was at Wal-mart, I checked there, and they had a can. I thought Andy's came in a tube, but I figured.. how different could it be? Well.. I think the one I bought had spoiled somehow.. (don't ask me how that happens??) because it wasn't the color it looked like it would be on the can "honey maple" ( I wanted a darker color, but that's all they had ).. and I knew it wouldn't look exactly like the color on the can, but it was straight orange, and it was.. lumpy. Very lumpy. I tried stirring it, but there was no getting it smooth, it was like chili! It was too gross to post a picture of, I'm serious! Now, I'm no expert, but I don't think that's how it's supposed to be..


Anyways, I really wanted to try the antiquing technique on one of my jewelry frames, so I thought of an alternative. I got some dark acrylic paint and diluted it with water, almost half and half. I had already distressed my frame and then once I painted on the watered-down-paint, I let it sit for half a minute, and then wiped it off with a paper towel. It left the stain on the creases and cracks, and corners that I had sanded, but I was able to rub it off everywhere else.


It gives it a similar effect, so I was happy with it. next time, I just won't go so sand paper happy cause the paint seeped into all the scratches, and I had sanded the front of the frame too, a little bit so it didn't look so polished, but now it has lots of brown scratches on the front. Anyways, I think it worked for what I had at the time, and I'll just have to take that other gel-stain back! Gross!


Have you ever used the gel stain or tried to antique something? Do you have any other antiquing tips?? I'd sure appreciate any of your ideas!

Monday, September 21, 2009

First Award.. Thank you thank you!!

Thanks to Linds over at That's So Cuegly, "My Creative Attempts" has been given the "One Lovely Blog" Award! That makes me feel so good, thanks so much! My first award! (wipe away a tear!)


I was a little surprised but excited to get nominated, because Lindsey always has the cutest ideas, and does so many projects each week, I could never keep up with her! I try to do what I can, but between 2 kids, hubs in school & work, and myself working a couple days a week, I'm lucky if I get one project in per week.. usually the ones I intend to work on, sit around my house for a couple weeks before I get to them.. but I do have the desire, and I try to fit it in when I can.. so thank you Lindsey for seeing the potential in me! =) Go check out That's So Cuegly, if you haven't already, and you're sure to be inspired! She's the Mod-Podge Queen!


Oh, and Lindsey also created this super cute new button for me! How much does she rock?! I'm a super beginner with Photoshop, so I wouldn't have a button of my own for a LONG time if it weren't for her, thanks again Lindsey!!


Of course it is now my privilege to nominate 5 other blogs for the award, and here they are: (random order)


You guys rock! Make sure you display your award on your blog, you deserve it!

Friday, September 18, 2009

Cute and easy fall Decor

PBJ
Posts by Julie:


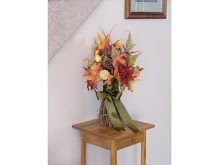
I saw a fall floral arrangement at 'Big Lots' that I really liked, but
didn't want to spend $10 that day. It looked simple enough and I figured
I could re-create it if I could find the twigs to make the base with. I
checked at the DI and found this easter wall hanging ($1) that had just
what I wanted, so I bought it and took it apart. I bundled the sticks,
tied them tightly with a scrap of bias tape a little above the halfway
point, then added 3 floral picks that I got at the dollar store. I didn't
glue them, just poked them among the sticks which was sturdy enough to
keep them in place. Then I tied it with a satin ribbon (I found a grab
bag at the fabric store that had 15- 2yd ribbons for 77 cents!) I tried
several colors, but am still wondering if a sheer burgundy ribbon would
look better. Anyway, I saved $6 and had fun making it myself.

USING STICKS FROM THIS::


TO MAKE THIS!!


.....

How gorgeous is that?! I love that she completely reused those sticks and made something totally different.. and WAY cuter! Great job mommy!

Wednesday, September 16, 2009

DI Finds

I am participating in Dalomba Days Goodwill Wednesdays! Check it out over there and see some more awesome finds! I got this tray(?) at the DI last week for $1. I love the shape, and just KNOW it has some serious cuteness potential, but it hasn't come to me yet. . my creativity has been a little hindered by the hideousness of this.. I laugh every time I see the cherubs on the side.. I'm very open for all your creative ideas! What color(s) do I paint this thing??


Aaahhh! Why the cherubs??

Many of you have already seen my other recent Goodwill finds. All the frames I'm using for my jewelry holders, being sold at Andy's PoppiesatPlay Craft Market have been bought at the DI. I don't have the before's, but they were all plain old ugly wooden picture frames, that we've painted, and have just put in cup hooks and plastic canvas. There's a million different ways you DIY-ers can change them up to fit your own personal style. At approx $2 each frame, it's pretty much a steal with what you can create!!


Those are just a few of the MANY we've made (my cute mom and I), so get creative!
Goodwill finds are the best!!

Monday, September 14, 2009

Cute new Ruffled Lampshade

After doing the nightstand for my daughter's room, I wanted to find a small lamp to go on it so she could have a nightlight that she can turn on and off by herself, next to her bed. I found this one at Saver's for $5 and it was the perfect size. It was neutral colored so I could've used it as is, but I wanted to spice it up a little to match her room. I used some extra fabric from her quilt that I made, and made a ruffle that matches her quilt as well.

I'm sure most of you have seen easy tutorials on re-covering a lampshade. This is what it looked like before. (Well, it also had a trim on the top and bottom edges, but I had already pulled those off)


I just basically made my ruffle first, (I can provide full instructions on how to sew a ruffle if anyone wants) and then I traced the lampshade on its side onto the fabric, rolling it as I traced. Once I got that cut out (with some extra seam allowance) I pinned and sewed the ruffle onto the fabric. I had to use two pieces and sew them together because I only had a narrow piece of fabric, so I couldn't do the whole thing on one piece. Since the lampshade had those creases anyways, it worked out fine.


Once it was put together, I just used spray adhesive and attached it to the shade. It was a little harder than I thought it would be getting it straight, since it had to match up where my ruffle would hit the bottom of the shade evenly all the way around.


It isn't perfect, but I put the best side forward, and my 2 1/2 year old doesn't know the difference! It also turned out that this cute little lamp was a touch-on and has 3 brightness settings, so my daughter was WAY excited about that, that she can change how dim or bright it is. Very 80's - awesome.

I'm happy with it. =)
I'm linked up today with Andy's "Creative Cats Tuesday", check it out and see the super cute projects she has today! I've also linked up with Kimba's DIY Day at A Soft Place to Land, there's TONS of DIY project, so skip on over to her place to see what everyone's creating!

Wednesday, September 9, 2009

Sneak Peak and Pumpkins

I have been solely working on these jewelry frames for the craft market coming up at the end of the month, so even though I haven't posted in a while, it's not because I haven't been working on anything, I've been doing these frames like crazy the last few days! (Not counting Labor Day, but hey, I get a holiday break!) So, I just thought I'd give you a sneak peak at some of the ones I've almost finished, they're turning out pretty cute, I think.


There will be many more to come...

Also, I've been seeing lots of Halloween decorations coming out already, and I'm way excited! I LOVE Halloween! I think it's fun to have one day where ghosts and witches and skeletons are fun, and not scary. Anyways, I saw this website today about pumpkins, (someday crafts) they are SUPER cute! I thought I'd share my own that I made a few years ago at a ward "Super Saturday" craft day cause they're so easy, anyone could do it. They're just different sized logs painted orange, and then wood shaped like the stems, painted green and glued on top. Easy, but cute to put outside my front door. Sorry, in the pics, they're a little dusty, they've been in storage..

You could also add some raffia or twine, or a cute leafy garland around the stems to make it cuter too!

Easy Peasy!

Tuesday, September 1, 2009

Adorable playroom

My mom will be posting some of her projects once in a while, cause like I said before, sometimes I am too busy, (most of the time) and don't have enough projects of my own to post, so this way, I have more brains and creativity from others to help fill up my blog! Anyways, she has been working on a new little table and chairs for the room underneath her stairs, for my daughter, who is her only granddaughter. (so far) Here's Julie's post and pic about the results!


I painted this playroom under the stairs almost 10 years ago, and since
my granddaughter is almost 3 yrs old, I decided I wanted to finish the
table so she could really use it. I already had a small round table,
(the cheap kind with screw on legs) that I cut and painted and my
husband attached it to the wall with hinges so it can be put up or down.
The chairs I found at the DI for $1 each. I sanded the rusty spots, and
then used metallic spray paint on the legs and sewed the slip covers.
-Julie


Way to go Mom!! She makes it sound so easy! It turned out seriously cute, and my daughter Jayci LOVES it! Great job!!